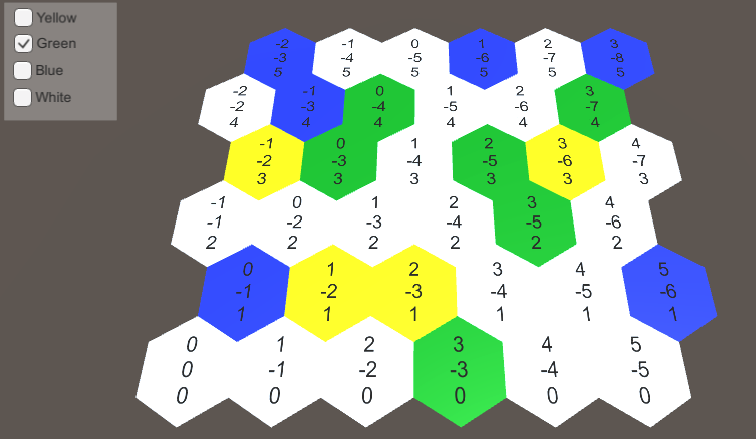
ヘックスマップのWarGameを作っていきます。
六角形の定義
はじめに、六角形の大きさを決めます。六角形にはその外側と内側に円が描くことができ、外側の円の半径を0.866025404倍が内側の円の半径になります。つまり、外側の円の半径で六角形の大きさを定義できるということです。
この定義を[HexMetrics.cs]に記述します。また、六角形の各頂点の位置もXZ平面上に定義します。
[HexMetrics.cs]
using UnityEngine;

public class HexMetrics {

	public const float outerRadius = 10f;
	public const float innerRadius = outerRadius * 0.866025404f;

	public static Vector3[] corners = {
		new Vector3(0f, 0f, outerRadius),
		new Vector3(innerRadius, 0f, 0.5f * outerRadius),
		new Vector3(innerRadius, 0f, -0.5f * outerRadius),
		new Vector3(0f, 0f, -outerRadius),
		new Vector3(-innerRadius, 0f, -0.5f * outerRadius),
		new Vector3(-innerRadius, 0f, 0.5f * outerRadius)
	};

}
グリッドの構築
ここから、六角形のグリッド (格子) を作っていきます。Planeを作って[HexCell]と名付け、それに[HexCell.cs]を追加してプレハブ化します。
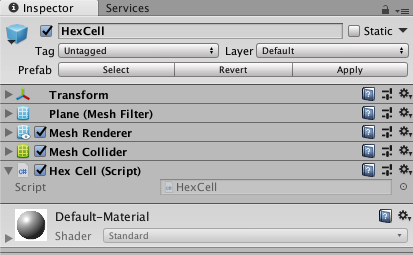
プレハブ化したらSene中の[HexCell]は削除します。
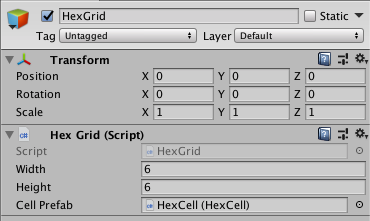
次に、[HexGrid]という名前で空のオブジェクトを作ります。それに[HexGric.cs]を追加し、次のように記述します。
[HexGrid.cs]
using UnityEngine;

public class HexGrid : MonoBehaviour {

	public int width = 6;
	public int height = 6;

	public HexCell cellPrefab;

}
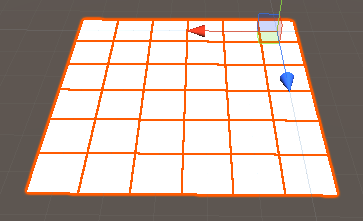
HexGridのCellPrefabにHexCellを指定して実行すると、このようになります。
座標を表示する
次に、セルに座標を表示するようにします。
HexGridにCanvasを追加して[HexGridCanvas]と名付け、写真のように設定します。
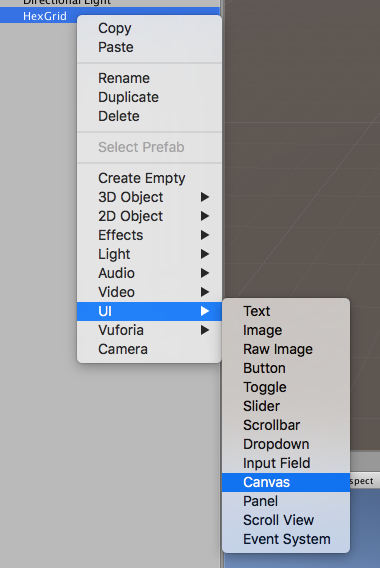
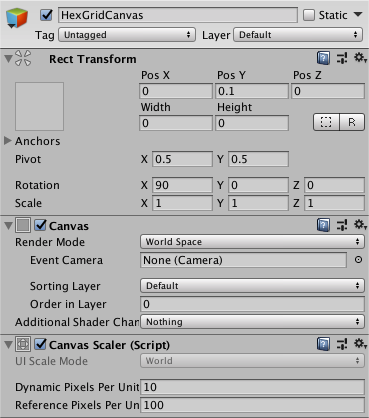
そして HexGrid > UI > Text でHexGridの子オブジェクトにTextを作成し、[HexCellLabel]と名付けて写真のように設定します。
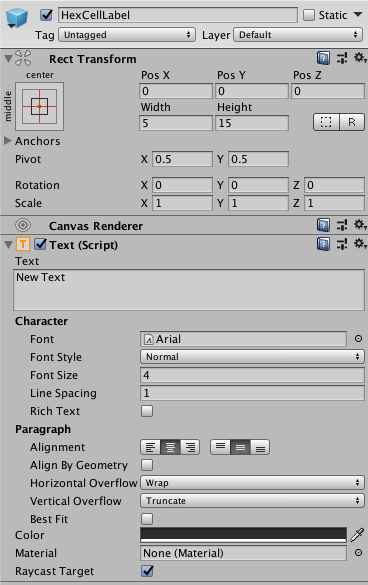
設定できたら[HexCellLabel]をプレハブ化し、Scene上からは削除しておきます。
[HexGrid.cs]に以下のコードを加えます。
[HexGrid.cs]
using UnityEngine.UI;

public class HexGrid : MonoBehaviour {
    ...

    public Text cellLabelPrefab;
    Canvas gridCanvas;

    void Awake () {
	gridCanvas = GetComponentInChildren<Canvas>();
	...
    }

    void CreateCell (int x, int z, int i) {
        ...

        Text label = Instantiate<Text>(cellLabelPrefab);
	label.rectTransform.SetParent(gridCanvas.transform, false);
	label.rectTransform.anchoredPosition = new Vector2(position.x, position.z);
	label.text = x.ToString() + "\n" + z.ToString();
    }
}
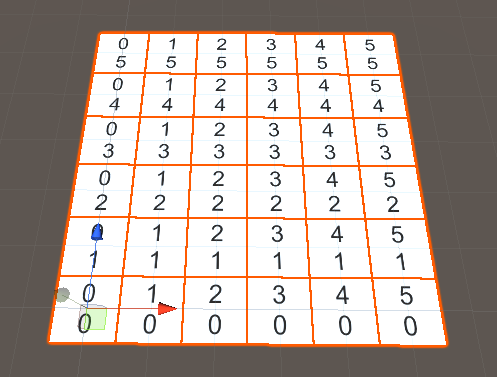
そして[HexGrid]のCellLabelPrefabにプレハブ化した[HexCellLabel]を指定して実行すると、このようになります。
六角形の位置
セルを視覚的に認識できるようになったところで、これらを移動していきます。
ヘックスグリッドでは、x軸方向に隣接するセル同士の距離は内側の半径の2倍で、z軸方向に隣接するセル同士の距離は外側半径の1.5倍でした。そうなるように[HexGrid.cs]を編集していきます。
[HexGrid.cs]
void CreateCell (int x, int z, int i) {
    Vector3 position;
    position.x = x * (HexMetrics.innerRadius * 2f);
    position.y = 0f;
    position.z = z * (HexMetrics.outerRadius * 1.5f);
    ...
}

次は、セルが交互になるようにします。
[HexGrid.cs]
void CreateCell (int x, int z, int i) {
    Vector3 position;
    position.x = (x + z * 0.5f - z / 2) * (HexMetrics.innerRadius * 2f);
    position.y = 0f;
    position.z = z * (HexMetrics.outerRadius * 1.5f);
    ...
}
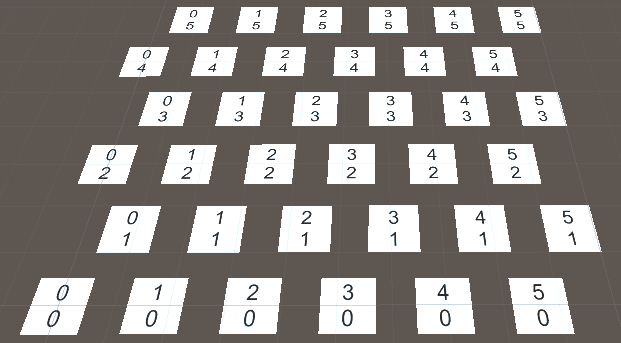
これで、ヘックスセルの配置が完了しました!
六角形のレンダリング
ここから、いよいよ六角形を作っていきます!
まずはプレハブの[HexCell]から[Plane(MeshFilter)]と[Mesh Renderer]と[Mesh Collider]を削除します。
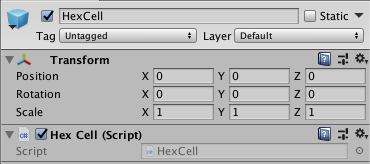
そして[HexGrid]の子オブジェクトとして[HexMesh]という名前で空のオブジェクトを作成し、これに[HexMesh.cs]を追加します。
[HexMesh.cs]で六角形のメッシュを処理します。
[HexGrid.cs]
using System.Collections.Generic;
using UnityEngine;

[RequireComponent(typeof(MeshFilter), typeof(MeshRenderer))]
public class HexMesh : MonoBehaviour {

    Mesh hexMesh;
    List<Vector3> vertices;
    List<int> triangles;

    void Awake() {
	GetComponent<MeshFilter>().mesh = hexMesh = new Mesh();
	hexMesh.name = "Hex Mesh";
	vertices = new List<Vector3>();
	triangles = new List<int>();
    }
}
コードが書けたら[HexMesh]にデフォルトのマテリアルを追加しておきます。
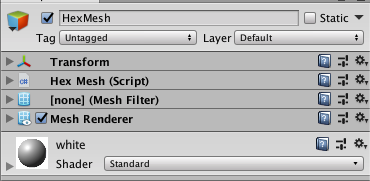
これで[HexGrid]から六角形のメッシュを取得することができます。また、[HexGrid]のStartメソッドが呼び出された時点で六角形のセルを三角形に分割するメソッドを呼び出します。
[HexGrid.cs]
HexMesh hexMesh;

void Awake () {
    gridCanvas = GetComponentInChildren<Canvas>();
    hexMesh = GetComponentInChildren<HexMesh>();
    ....
}

void Start() {
    hexMesh.Triangulate(cells);
}
セルを三角形に分割するTriangulateメソッドは[HexMesh.cs]に書きます。このメソッドは既にセルを三角形に分割していても呼び出せるので、まず古いデータをクリアします。そしてすべてのセルを三角形に分割し、その情報をMeshに格納してメッシュ法線を再計算します。
[HexMesh.cs]
public void Triangulate(HexCell[] cells) {
    hexMesh.Clear();
    vertices.Clear();
    triangles.Clear();
    for(int i=0; i<cells.Length; i++) {
     	Triangulate(cells[i]);
    }
    hexMesh.vertices = vertices.ToArray();
    hexMesh.triangles = triangles.ToArray();
    hexMesh.RecalculateNormals();
}

void Triangulate(HexCell cell) {
}
次に3つの頂点の座標から三角形を追加する便利なメソッドを作ります。
[HexMesh.cs]
void AddTriangle(Vector3 v1, Vector3 v2, Vector3 v3) {
    int vertexIndex = vertices.Count;
    vertices.Add(v1);
    vertices.Add(v2);
    vertices.Add(v3);
    triangles.Add(vertexIndex);
    triangles.Add(vertexIndex + 1);
    triangles.Add(vertexIndex + 2);
}
そして、三角形を6つ生成して六角形を作ります。
[HexMesh.cs]
void Triangulate(HexCell cell) {
    Vector3 center = cell.transform.localPosition;
    for (int i = 0; i < 6; i++) {
	AddTriangle(
		center,
		center + HexMetrics.corners[i],
		center + HexMetrics.corners[i + 1]
	);
    }
}
ただし、このままではエラーになります。最後の三角形が存在しない7番目の頂点を取得しようとしているからです。これは、最初の頂点と同じですので、[HexMesh.cs]に7番目の頂点を書き加えます。
[HexMetrics.cs]
public static Vector3[] corners = {
    ...
    new Vector3(0f, 0f, outerRadius)
};
そして実行すると...

ついてヘックスマップができました!
ヘックスマップの座標
しかしヘックスマップの座標を見てみると、Z座標はきれいですがX座標はガタガタになっています。このままでは扱いにくいのでX座標もきれいにしていきましょう。
別の座標系への変換にも使えるように、[HexCoordinates.cs]に構造体を定義します。これは、Unityが保存できるようにSerializableにします。これによって、再コンパイルされても残るようになります。
オフセット座標(今の汚い座標)からきれいな座標を作成する静的メソッド、文字列変換のメソッドも作っておきます。文字列変換のメソッドは、デフォルトのToStringメソッドが構造体の型名を返すので、これを座標を返すようにオーバーライドしたものです。
[HexCoordinates.cs]
using UnityEngine;

[System.Serializable]
public struct HexCoordinates {

    public int X { get; private set; }

    public int Z { get; private set; }

    public HexCoordinates(int x, int z) {
	X = x;
	Z = z;
    }

    public static HexCoordinates FromOffsetCoordinates(int x, int z) {
	return new HexCoordinates(x, z);
    }

    public override string ToString () {
	return "(" + X.ToString() + ", " + Z.ToString() + ")";
    }

    public string ToStringOnSeparateLines () {
	return X.ToString() + "\n" + Z.ToString();
    }

}
これで[HexCell]に一連の座標を渡すことができるようになりました。
[HexCell.cs]
public class HexCell : MonoBehaviour {

    public HexCoordinates coordinates;
}
新しい座標を使うように、[HexGrid.cs]のCreateCellメソッドを修正します。
[HexCell.cs]
void CreateCell (int x, int z, int i) {
    ...

    HexCell cell = cells[i] = Instantiate<HexCell>(cellPrefab);
    ...
    cell.coordinates = HexCoordinates.FromOffsetCoordinates(x, z);

    Text label = Instantiate<Text>(cellLabelPrefab);
    ...
    label.text = cell.coordinates.ToStringOnSeparateLines();
}
では、X座標を修正してまっすぐ整列するようにします。
[HexCoordinates.cs]
public static HexCoordinates FromOffsetCoordinates (int x, int z) {
    return new HexCoordinates(x - z / 2, z);
}
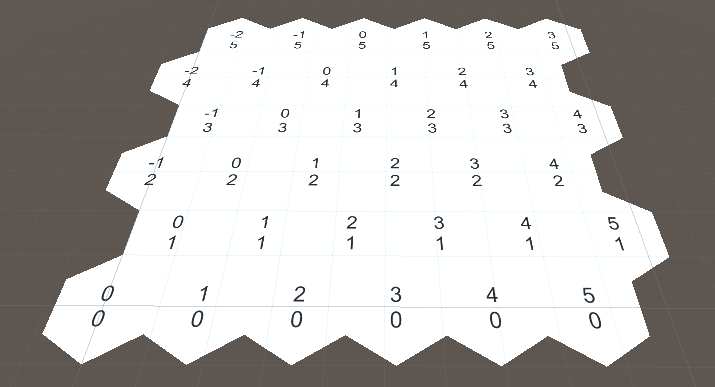
これできれいな座標ができました!
しかし、六角形のもう一つの軸が表現できていません。そこでこのヘックスマップにY座標を追加して3次元で表現することにします。
このX座標とY座標は対称になっているので、ヘックスセルの3つの座標を合計すると常に0になります。よってY座標はX座標とZ座標から計算できるので、変数に格納しておく必要はありません。
Y座標を計算するコードを追加し、座標表示用メソッドをXYZ座標を表示するように修正します。
[HexCoordinates.cs]
public int Y {
    get {
	return - X - Z;
    }
}

public override string ToString () {
    return "(" + X.ToString() + ", " + Y.ToString() + ", " + Z.ToString() + ")";
}

public string ToStringOnSeparateLines () {
    return X.ToString() + "\n" + Y.ToString() + "\n" + Z.ToString();
}
インスペクタで座標を表示する
プレイモード中にヘックスセルを選択した時に、その座標をインスペクタに表示できるようにしてみましょう。
[HexCoordinates.cs]
[SerializeField]
private int x, z;

public int X {
    get {
	return x;
    }
}

public int Z {
    get {
	return z;
    }
}

public int Y {
    get {
	return - X - Z;
    }
}

public HexCoordinates(int x, int z) {
    this.x = x;
    this.z = z;
}
これでインスペクター上で座標が確認できるようになりました!

しかしこのままでは座標の値を編集できてしまいますし、下に表示されているので座標らしく見えません。
[HexCoordinatesDrawar.cs]にHexCoordinates型のカスタムプロパティドロワーを定義して、より見栄え良くさせましょう。
[HexCoordinatesDrawar.cs]
using UnityEngine;
using UnityEditor;

[CustomPropertyDrawer(typeof(HexCoordinates))]
public class HexCoordinatesDrawar : PropertyDrawer {

    public override void OnGUI(Rect position, SerializedProperty property, GUIContent label) {
	HexCoordinates coordinates = new HexCoordinates(
	    property.FindPropertyRelative("x").intValue,
            property.FindPropertyRelative("z").intValue
	);
	position = EditorGUI.PrefixLabel(position, label);
	GUI.Label(position, coordinates.ToString());
    }
}
これできれいに表示されるようになりました!

セルに触れる
ここからはセルに触れるようにしていきましょう。
セルに触るために、マウスの位置から光線を出します。
[HexGrid.cs]
void Update() {
    if(Input.GetMouseButton(0)) {
	HandleInput();
    }
}

void HandleInput() {
    Ray inputRay = Camera.main.ScreenPointToRay(Input.mousePosition);
    RaycastHit hit;
    if(Physics.Raycast(inputRay, out hit)) {
	TouchCell(hit.point);
    }
}

void TouchCell(Vector3 position) {
    position = transform.InverseTransformPoint(position);
    Debug.Log("touched at " + position);
}
これでクリックした場所にRayを飛ばせるようになりましたが、このままではまだ何もできません。
Rayが当たるように、HexMeshコライダーをつけます。
なおコライダーはボックスコライダーでもいいのですが、それだと六角形のグリッドにフィットしませんし、将来セルに高さなどをつけたりすると手に負えなくなります。なので、動的にコライダーを生成することにします。
[HexMesh.cs]
MeshCollider meshCollider;

void Awake() {
    GetComponent<MeshFilter>().mesh = hexMesh = new Mesh();
    meshCollider = gameObject.AddComponent<MeshCollider>();
    ....
}

public void Triangulate (HexCell[] cells) {
    …
    // コライダーにメッシュを割り当てる
    meshCollider.sharedMesh = hexMesh;
}
次にクリックした位置をヘックスマップの座標に変換するプログラムを書きましょう。
[HexCoordinates.cs]
[HexGrid.cs]
void TouchCell(Vector3 position) {
    position = transform.InverseTransformPoint(position);
    HexCoordinates coordinates = HexCoordinates.FromPosition(position);
    Debug.Log("touched at " + coordinates.ToString());
}
これでクリックしたセルの座標を出力することができるようになりました!

セルに色をつける
セルに触れるようになったので、今度はクリックしたセルの色を変えれるようにしてみましょう。
デフォルトの色とクリック後の色を定義します。
[HexGrid.cs]
public Color defaultColor = Color.white;
public Color touchedColor = Color.magenta;
[HexCell.cs]
public Color color;
[HexGrid.cs]
void CreateCell (int x, int z, int i) {
    …
    cell.coordinates = HexCoordinates.FromOffsetCoordinates(x, z);
    cell.color = defaultColor;
    …
 }
[HexMesh.cs]
List<Color> colors;

void Awake () {
    …
    vertices = new List<Vector3>();
    colors = new List<Color>();
    …
}

public void Triangulate (HexCell[] cells) {
    hexMesh.Clear();
    vertices.Clear();
    colors.Clear();
    …
    hexMesh.vertices = vertices.ToArray();
    hexMesh.colors = colors.ToArray();
    …
}

void Triangulate (HexCell cell) {
    ...
    for (int i = 0; i < 6; i++) {
        AddTriangle(
        ...
	);
	AddTriangleColor(cell.color);
    }
}

void AddTriangleColor (Color color) {
    colors.Add(color);
    colors.Add(color);
    colors.Add(color);
}
[HexGrid.cs]
public void TouchCell (Vector3 position) {
    position = transform.InverseTransformPoint(position);
    HexCoordinates coordinates = HexCoordinates.FromPosition(position);
    int index = coordinates.X + coordinates.Z * width + coordinates.Z / 2;
    HexCell cell = cells[index];
    cell.color = touchedColor;
    hexMesh.Triangulate(cells);
 }
そして、Assets > Create > Shader > Standard Surface Shader で新しいデフォルトシェーダーを作成し[VertexColors]と名付けておきます。

[VertexColors.shader]
struct Input {
    float2 uv_MainTex;
    float4 color : COLOR;
};

void surf (Input IN, inout SurfaceOutputStandard o) {
    fixed4 c = tex2D(_MainTex, IN.uv_MainTex) * _Color;
    o.Albedo = c.rgb * IN.color;
    ...
}
そしてHexMeshのマテリアルのシェーダーにVertexColorsを指定します。

そして実行してセルをクリックすると...

色が変わるようになりました!
マップエディタを作る
次に、ヘックスセルの色を変える簡単なエディタを作ってみましょう。
HexGridのTouchCellメソッドを以下のように書き換えます。
[HexGrid.cs]
public void ColorCell(Vector3 position, Color color) {
    position = transform.InverseTransformPoint(position);
    HexCoordinates coordinates = HexCoordinates.FromPosition(position);
    int index = coordinates.X + coordinates.Z * width + coordinates.Z / 2;
    HexCell cell = cells[index];
    cell.color = color;
    hexMesh.Triangulate(cells);
}

そして、[HexMapEditor.cs]を作成し、[HexGrid.cs]からUpdateメソッドとHandleInputメソッドを移します。

[HexMapEditor.cs]
>|cs|
using UnityEngine;

public class HexMapEditor : MonoBehaviour {

    public Color[] colors;
    public HexGrid hexGrid;
    private Color activeColor;

    void Awake () {
	SelectColor(0);
    }

    void Update () {
	if (Input.GetMouseButton(0)) {
	    HandleInput();
	}
    }

    void HandleInput () {
	Ray inputRay = Camera.main.ScreenPointToRay(Input.mousePosition);
	RaycastHit hit;
	if (Physics.Raycast(inputRay, out hit)) {
	    hexGrid.ColorCell(hit.point, activeColor);
	}
    }

    public void SelectColor (int index) {
	activeColor = colors[index];
    }
}
そして Hierarchy > 右クリック > UI > Canvas で、[HexMapEditor]と名付けた新しいCanvasを作ります。
そこに[HexMapEditor.cs]を追加し、写真のように設定します。
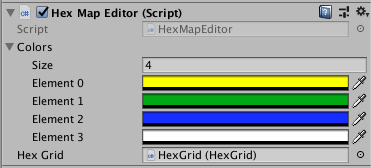
この[HexMapEditor]の子オブジェクトとして 右クリック > UI > Panel からPanelを加えます。[ColorPanel]と名付けておきましょう。
そして[ColorPanel]に Add Component > UI > Toggle Group でトグルグループを加えます。
さらに[ColorPanel]の子オブジェクトとして UI > Toggle からトグルを4つ[ToggleYellow], [ToggleGreen], [ToggleBlue], [ToggleWhite]を作成します。
[ToggleYellow]のインスペクター上に On Value Changed(Boolean) というがあるので、プラスボタンをクリックします。
そしてHierarchy上の[HexMapEditor]をドラッグ&ドロップし、SelectColorメソッドを選択します。

数字は[ToggleYellow], [ToggleGreen], [ToggleBlue], [ToggleWhite]の順に0, 1, 2, 3を設定します。
これでセルの色を自由に変えれるようになりました!
